From an email from Mark:
Emblem keys are $25
Generic keys are $8
There are 3 emblem designs, all the same key

AKA Project Farfemmuven
From an email from Mark:
Emblem keys are $25
Generic keys are $8
There are 3 emblem designs, all the same key
Hi Jim,
Sorry I haven’t gotten back to you. I am a new father with an 8 day old son, which is amazing, so I’m pulling triple duty between home and work. I think your best option is going to be our 1776 project streetwise engine and a stock transmission. For your use, there is no need to waste money on a monster engine. The project streetwise will give you a little more than 100hp with the dual weber 40 IDF carbs. To get yourself better low end and throttle response, I can put in a different cam and 1.25 to 1 ratio rockers. As for the trans, we can build one with the 4.12 ring and pinion. This is what I used on mine and it gives great get up and go from 0-60. Here are the links to our website on these items.
http://www.mofoco.com/item/
Please let me know what you think,
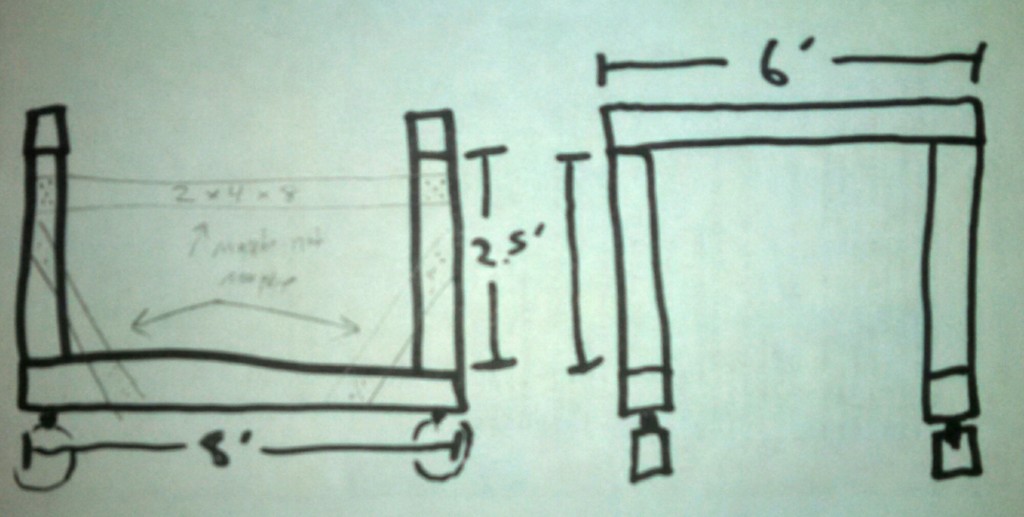
Over designed and based on 8′ long x 2, 6′ wide x 2 with 4 x 2.5′ risers.
4″x4″x16′ non-treated (8′ x 2) $15
4″x4″x12′ non=treated (6′ x 2) $12
4″x4″x10′ non-treated (2.5′ x 4) $ 10
2″x4″x8′ non-treated x 2 $ 6
BC4 Post Cap Braces x 8 $35
#10 x 1.5″ Hex Head Screws (SKU 479710) $12
3″ Steel Casters (300lbs x 4 SKU 194425) x 4 $22
GRAND TOTAL $112
FROM: http://www.shoptalkforums.com/viewtopic.php?f=19&t=144363&start=15
I first braced the doors with some 2X4’s and metal strips, not pretty but it works and was cheap. Luckily there is no pressure on them after raising the body and the heater channels look to be free of rust.
![IMG_3369[1]](http://www.73ghia.com/wp-content/uploads/2014/07/IMG_33691.jpg)
I used 4×4’s, some I had laying around from a deck/fence project that took priority over working on the car earlier in the month. I used 8′ lengths for the lower sections and 6’5″ for the width to allow wider tires when I eventually get to that point. The vertical pieces are 2′ (the OP later said he would add 4 inches to those 2 foot sections) and allowed the pan to almost completely clear the body with the front suspension attached. I removed that and put it on dolly’s a bit lower that allowed full clearance.
![IMG_3370[1]](http://www.73ghia.com/wp-content/uploads/2014/07/IMG_33701.jpg)
http://www.customchromeplating.com/index.html
Anyone who has searched for a good reliable chrome plater in recent years knows that their ranks are thinning. Both foreign competition and EPA restrictions have made it increasingly difficult to run a plating shop profitably while turning out good work.
At CustomChrome Plating, in Grafton, Ohio, we have not only survived in this market, but continue to thrive, all due to owner Jon Wright’s simple business philosophy: pride in our work, and treating people fairly.
Most of our work is in the automotive and motorcycle aftermarket. Customers bring or send in their parts, and their projects include antique or classic cars, hot rods, street rods, customs, muscle cars, boats, and motorcycles. CustomChrome Plating does not do production work, so we can put our full concentration and attention to all of the individuals and hobby oriented shops who use our services. Our staff thrives on difficult and challenging projects.
Thank you for visiting our website. We hope you find it informative, and that you’ll give us a call. All the images on this website had the metal finishing and plating done by CCP, and our excellence in plating quality is equaled by our customer service.
FROM:http://www.karmannghia.com/page.asp?pageid=48
General Areas:
1. Do the body and mechanical first, the interior last.
2. Do not cut out damaged sheet metal BEFORE you receive replacement panels (cutting an inch too much can be miles of heartache). Some Ghia sheet metal is very hard to find.
3. Paint:
a. Disassembly: Remove all exterior rubber seals, bumpers, lights, molding, chrome and glass. If it is your first Ghia; take a few pictures first, then “Bag & Tag” all related parts together. A simple thing like threading nuts/screws back on the parts they came from will save you hours when assembling.
b. Be sure to remove dirt/pealing paint from under the rear deck lid louvers. Ask the painter to pay special attention to this area. Also the area where the body curves under, particularly the nose and rocker panels (under the doors). Both prep and painting.
c. Inspect your Ghia in general just before spraying.
In Particular:
4. When mounting the Door Glass to the Lift Channel inside the Door, NEVER tighten the upper two bolts (that go through the Door Glass) more than ½ turn past snug or BOOM goes the Glass.
5. The rear Hood Seal only goes ½ way around the bottom of the Rear Deck Lid opening. In there design wisdom, the Germans thought this is the way it should be and never changed it throughout production. The mistake here is that people with cut down the front hood seal to fit the back.
6. On 69 and later Ghias, to remove the “D” gas door handle (under the dash on the passenger side) pull the handle out to open the gas door. In this position grab the coiled wire just below the handle with needle-nose pliers. While holding firmly so it does not spin, turn the “D” handle counter clockwise to unscrew it. If you try this without the pliers, a second wire inside the coil will break from the twisting and a new, rather expensive unit will need to be purchased.
7. Take off the Mud Sills (also known as Hinge Pillar Cover Plates). This is the plate at the back of the front wheel wells. There are two bolts you can see inside the wheel well, and on 68 and later models, one stud that sticks through the back corners of the front deck opening. Behind them you will find rust causing gunk 90% of the time. From here the rust will quickly invade your rocker panels, which are the thin but structurally significant body beams that run under the side doors. Replace with new seals and reinstall.
8. Door Check Strap, Pin & Rollers, need to be in good shape (about $15 a door). This assembly built into the upper Hinge keeps them from swinging too far and causing damage to the Door and/or Hinges. If you can lift up on your Door when it is open and feel a little play, at least one Hinge is bad ($40). You may be able to replace just the bottom Hinge as it usually goes first and then takes the top Hinge with it ($40), which then chews up your striker (holds the Door Latch to the car when closed, (another $40) and then breaks the Latch (mechanism inside the door…$50-$125 depending on year). Don’t delay on setting this area right!
9. Removing the 1/4 window chrome molding Use a little WD40 (or something stronger if you are not worried about the paint) and spray it in-between the chrome molding and the body. Pull/push/pry this piece FORWARD. After it moves forward about 1″, it will lift off easily, the only resistance being the old caulking. Door top Scraper Molding on pre 1960 models also slide forward (with the door open) until they reach an open area in their bottom channel. When you get one off, it will be very clear how it all works.
10. Make sure the drain holes in the bottom of your doors are open. A butter knife is a good tool for this if you do not have the door panels off. Water is going to get in your door. If these 3 holes are plugged, the Door will rust and the upholstery panels will warp.
Got any more of your own to add? I would love to hear from you and save someone else a little heartache.
Thanks,
Scott – “The Ghia Guy”
I would like to clear up a few points you might not be aware of about the Mendeola Suspesnion.
The rear arms are built with .5 degrees of camber at a 1.5 lowered ride height, and also has a camber adjusting plate that allows for even more camber adjustment. They also have toe and height adjustments. They are also the only rear trailing arms on the market that are available in a narrowed arm. This allows for a lot more tire and wheel combo’s. In fact we just fit 17×8 rear wheels with 215/40/17 tires under the rear of a low light ghia with out major fender mods.
Take a look at MendeolaSuspension.com for more info.
Also guys, the Mendeola Suspension prices are $3295 for the complete front kit spindle to spindle and $2395 for the complete rear kit. That’s less then 6k. Why have a 8-10k motor that hauls a$$ when you can’t stop or turn just as good? Just saying…..


http://www.shoptalkforums.com/viewtopic.php?t=127619
Ghia Road Course Setup
http://www.shoptalkforums.com/viewtopic.php?t=137146
250HP 1600dp
http://www.shoptalkforums.com/viewtopic.php?p=1187205#p1187205
Hi juki48,
Dual 19mm bars on your ’74 will make your car feel very quick and responsive for street use. The front bar keeps the body roll down and keeps both front tires planted. The rear bar decreases the understeer and is the big contributor to the quick-response feel. The rear bar really enhances “turn-in” as in where you are steering into a turn and the car responds almost instantly.
But, for very high speed use, where you want understeer, a front bar alone is just right. High speed here means 100 mph sweepers where you want no sudden moves off course.
FJC