Volkswagen Technical Articles

From http://type2.com/bartnik/tech1.htm#engine

Volkswagen Technical Articles


This page is an attempt to empower you to fix your own VW and do it correctly. Unfortunately, there are not many mechanics that are familiar with the VW air-cooled engines anymore, and there are some that claim to be VW experts who are really just hacks. Also, since the price of labor to have your car fixed is not affordable to many, it makes good economic sense to learn how to do the work on your Volkswagen yourself.

This page is updated fairly often, and I will try to add as many articles as possible. I’ve been taking pictures of work I’ve done on my van so as soon as they get scanned, this will be like a mini-manual. I’m sure it will be nowhere near complete, but it will cover the more common and basic problems that can be easily fixed by the shadetree mechanic.


The first thing you need if you want to work on your own Volkswagen is a good set of manuals. I highly recommend those listed below.

“How To Keep Your Volkswagen Alive: A Manual of Step-By-Step Procedures for the Compleat Idiot” by John Muir.
This book has been around since the ’60s and has been updated much since then. The edition I have now is the 25th anniversary edition. Muir’s book is excellent for the beginner but Muir is by no means the ultimate authority. You have to take a lot of what he says with a grain of salt as not all of his advice is correct. Still, it’s an excellent manual to use in conjunction with other manuals, and Muir’s writing style can make complex issues clearer.
The Bentley manual.
The Bentley manuals are the official factory service manuals for Volkswagen. They are put out by Robert Bentley Publishers, hence the name. They are generally very good reference manuals and I highly recommend owning one.
The Haynes manual.
Haynes is a British publishing company that puts out manuals on most of the air-cooled Volkswagens. Their manuals are typically readily available and are generally inexpensive.
“How To Rebuild Your Volkswagen Air-Cooled Engine” by Tom Wilson.
This book is a step-by-step guide to removing, tearing down, rebuilding, and then re-installing your engine. Even if you don’t plan on getting that deep into your engine, this book is filled with photos that give you a great idea of what’s really going on in there.

In addition to those above, if you have a ’75 or later Beetle or Super Beetle, a ’75 or later Bus, or a ’67 and later Type 3, you should have fuel injection (assuming a US-spec model). In that case, a manual you will find very helpful is “How To Understand, Service and Modify Bosch Fuel Injection and Engine Management” by Charles O. Probst. It’s also put out by Robert Bentley Publishers, the same publisher as the official VW repair manuals. It covers all Bosch fuel injection systems, including the D-Jetronic system found on Type 3s and the L-Jetronic system found on Beetles, Super Beetles, and Buses.

Finally, before you begin wrenching, see this informative tool guide.


DISCLAIMER: Unfortunately, in these litigious times, some moron would probably try to sue me for something regarding the information on this page, so here’s the disclaimer. The procedures on this page are presented as guidelines ONLY. They reflect particular jobs that were done by myself or by another author and were written down from memory as a guide to others who might need to do the same procedure. I make no representations as to the accuracy of the information contained here (please remember that I am not a professional mechanic and that free advice is worth every cent). What you do to your car is what YOU do to your car. I take no responsibility for the results of YOUR actions, lack of common sense, or stupidity. The procedures below were written to help VW owners. They should always be used in conjunction with a good set of repair manuals, such as those mentioned above. Have a nice day.

BRAKES

Replacing rear brake shoes and wheel cylinders on a Bus.

Replacing the front brake pads on a Karmann Ghia.

Replacing the rear brake shoes on a Vanagon.

Replacing the parking brake cables on a Vanagon.

Replacing the master cylinder on a Karmann Ghia.

CLUTCH

Replacing the clutch master cylinder on a Vanagon.

Replacing the clutch slave cylinder in a Vanagon.

Replacing the clutch in an early Vanagon or late Bus (with Type 4 air-cooled engine).

ELECTRICAL AND IGNITION

Removing and replacing the alternator on a ’72-’79 Bus.

Removing and replacing the starter on an air-cooled Volkswagen.

Starter troubleshooting procedure.

Replacing the points and condenser on an air-cooled Volkswagen engine.

Replacing the spark plugs on an air-cooled Volkswagen engine.

Hot-start relay installation instructions.

Ignition timing instructions for air-cooled Volkswagens.

ENGINE

Carburetor removal/replacement on a 1600cc dual port Type 1 engine (Beetle, Karmann Ghia, Thing, Super Beetle).

Engine and transmission removal/installation in an air-cooled, manual transmission Vanagon (1980-1983).

Thermostat replacement/installation on late Buses and early Vanagons with the Type 4 air-cooled engine.

Valve adjustment on a Type 1 engine.

Changing the oil on an air-cooled Volkswagen engine.

Replacing the pushrod tube oil seals on late Buses and early Vanagons with the Type 4 air-cooled engine.

Adjusting the automatic choke on carbureted air-cooled Volkswagen engines.

Adjusting the fan belt on the Type 1 engine.

EXHAUST AND HEATER

Replacing the heater cables on an air-cooled Vanagon.

SUSPENSION

Removing/replacing the front axle beam on a late Bus.

TRANSAXLE

CV joint maintenance.

MISCELLANEOUS

Engine code interpretation.

VIN interpretation.

What kind of gas should you be buying?

Removing/installing window glass on an air-cooled Volkswagen.

How to torque the rear axle nut without a torque wrench.

Valve Adjustment

From http://type2.com/bartnik/valveadj.htm

APPLICATIONS: Volkswagen Type 1 engine, specifically the 1600cc version.  This probably applies to other Type 1 engines as well and the theory is similar for the Type 4 engine, but I write this after doing a valve adjustment on a 1974 Karmann Ghia convertible, so take that for what it’s worth.

Valve adjustment is a regular maintainence item for the air-cooled Volkswagen Type 1 engine.  It must be done every 3000 miles.  What you are doing is adjusting the clearance between the rocker arms and valve stems.

TOOLS NEEDED: feeler gauge with .006″ blade; large screwdriver; medium sized flat-blade screwdriver; 13mm wrench, preferably box-end; ratchet with appropriate socket to fit the nut on the generator/alternator pulley; bottle of White-Out; two new valve cover gaskets; tub of wheel bearing grease; fine-grit sandpaper or steel wool; a straight-edge of some kind.

Your valves should be adjusted only when the engine is stone cold.  So, the night before you plan to do the job, park the car where you will be working the next day and let it sit overnight.  You can’t start the engine to move it before you adjust the valves.

OK, the first step to adjusting your valves is to put the transmission in neutral.  This way, you will be able to turn the engine over by hand.  Now, look at your crankshaft pulley.  You will see the timing notch(es) cut into the rim of the pulley.  On the rear pulley face (rear is rear) you should see a dot near the edge.  This dot is pressed into the pulley face.  It marks TDC (top dead center) for cylinder number 1.  What you want to do is take your straight-edge and use it to make a mark on the opposite end of pulley, exactly 180 degrees from the dot.  Make the mark with White-Out.  Now you should have two marks on the pulley, one pressed in from the factory, and one made with White-Out, and both marks should be exactly opposite each other.

OK, now take your ratchet with socket that fits the alternator pulley nut and put it on the alternator pulley nut.  If your pulley nut is too big for your collection of sockets, use an adjustable wrench.  You are going to turn the engine over with this ratchet/wrench.  Turn the engine counterclockwise so that the factory dot on the pulley lines up evenly with the seam in the crankcase (visible above the pulley).  Pull off the distributor cap and verify that the rotor is in position to fire the #1 spark plug (see which wire the rotor is sitting underneath, and make sure it goes to #1).

(If turning the alternator pulley nut does not turn the engine but simply turns the alternator pulley, your drive belt is too lose.  You tighten it by remove the pulley nut, the shims stored underneath it, and the rear pulley half, then add some of the shims between the two pulley halves until the tension is within specifications.  Check your manual for exact specifications.)

If it does not point to the number 1 cylinder, rotate the engine counterclockwise until it does.  When the rotor lines up with the number 1 cylinder spark plug wire, the dot or mark on the pulley should line up with the seam in the crankcase.  Don’t expect the rotor alignment to be exact, but it will be very close (remember that the spark is not usually fired exactly at top dead center).

OK, so your situation is now that you have one of the two marks on the pulley (should be the factory dot) aligned with the seam in the crankcase and the rotor is roughly pointing to the number 1 cylinder firing position.  You are now at top dead center for cylinder number 1.

Now you have to crawl under the right side of the car and remove the valve cover from the right side bank of cylinders.  The one closest to the front of the car is number 1, and the other is number 2.  For confirmation, the cylinder numbers are stamped in the tin next to the spark plugs.  You will see that the valve cover is held on with a large wire bail.  You need to use your large screwdriver to pry the bail down.  Once the bail is down, you can simply pull the valve cover off.  If you’re lucky, the cork gasket will all come off in one piece.  If you’re not lucky and someone used some kind of gasket sealer on the valve cover gasket, you will have a really fun time with it.  Anyway, we can worry about that later.

Once you have the valve cover off, observe the scene before you.  You are peering into your cylinder head.  You see the rocker arm assembly, with four rocker arms, four pushrods, and four valves with valve springs.  You see that the pushrods push on the rocker arms, which push on the valves, opening them.  When the pushrods stop pushing on the rocker arms, the valve springs close the valves.  What pushes on the pushrods is the camshaft, pushing on the solid valve lifters, which push on the pushrods, etc.

Look at the valves for #1.  There are two, the front-most ones.  They should both be closed completely, and in the same position.  If one is in a different position than the other, you are not at TDC for that cylinder, so go back over the above steps and find out where you messed up.  Wiggle the rocker arms.  You should feel a little bit of movement.  You are going to be adjusting the clearance between the rocker arm and the valve stem to .006″, which is a pretty small clearance.

OK, so get your feeler gauge out and whip out the .006″ blade.  You will notice that it’s quite thin.  What you want to do is push the rocker arm in at the bottom and make sure the pushrod is fully seated in it, so take up all the slack.  Then stick your .006″ feeler gauge into the gap between the valve stem and the rocker arm.  Make sure you stick it in straight or you will get a false reading.  You should be able to feel it slide through the gap with only a slight bit of friction.  If it’s hard to push through or grabs, then the valve is tight and requires adjustment.  Likewise, if it just slips right through with no friction at all, the valve is loose and also requires adjustment.

To adjust, observe the valve end of the rocker arm.  You will see what looks like a screw surrounded with a 13mm nut.  The nut is a locknut, so what you do is get your 13mm wrench on it and loosen the locknut.  Then you will see that the screw in the middle is free to turn, so get your medium screwdriver and turn it whichever way you need to turn it to achieve a .006″ gap.  Then tighten the locknut while holding the screw stationary with your screwdriver.  Then re- check your adjustment to make sure tightening it hasn’t changed the adjustment.  Once you get that valve adjusted to .006″, then do the other valve for #1 exactly the same way.  It’s the one directly behind the one you just did.  As a note, the two valves at the very front and very rear of the cylinder head are exhaust valves, and the two inner ones are intake valves.

Now, once you’ve completed both valves for number 1, then you have to crawl back out from under the car and rotate the engine counterclockwise 180 degrees.  That is, use your ratchet on the alternator pulley again, and turn the engine counterclockwise until the other mark on the crankshaft pulley is aligned with the crankcase seam.  This will bring the number 2 cylinder to TDC, and that’s the one immediately to the rear of the number 1 cylinder.  Note why this is: The firing order for the cylinders is 1-4-3-2, and the engine normally rotates clockwise.  So when you rotate the engine counterclockwise, you are essentially following the order 1-2-3-4.

Now, you adjust the valves for the number 2 cylinder the same way you did number 1.  Then when you are done there, you get out and rotate the engine another 180 degrees counterclockwise, which brings cylinder number 3 into position for the valve adjustment.  Number 3 is on the left side of the engine, and is the front-most cylinder.  So naturally you will have to remove the valve cover on the left side before adjusting the valves on number 3.  Leave the valve cover off on the right side for now, we’ll put both of them back on later.

Once you are done with number 3, rotate the engine another 180 degrees counterclockwise, bring cylinder 4 to TDC for valve adjustment.  Once you are done with that, if you’re uneasy, you can rotate the engine 180 degrees at a time and doublecheck all your valve adjustments in the same order you adjusted them.

Now, keep track of which valves (if any) were tight, meaning had a gap smaller than .006″, where the feeler gauge wouldn’t fit through.  You want to see if the same valves are tight next time you do a valve adjustment.  If they are, you may have valves that are stretching and getting ready to break, so it would be good to remove the cylinder heads and have the valve gear inspected.  You must remove the engine before removing the cylinder heads, but preventive maintenance is better than having a valve stretch and then break on you, which will mandate a complete engine rebuild.  Typically, the #3 exhaust valve first exhibits these symptoms, so keep a special eye on that one.

OK, well now you’re done adjusting your valves and you are ready to re-install the valve covers.  First you need to remove the remains of the old gaskets from the valve covers and cylinder heads.  If someone used a gasket sealer on them, especially on the cylinder head side, you will have a real time getting it off, but whatever you do, you must get all the gasket remnants off.

Once you’ve done that, run your finger over the gasket sealing surfaces on the heads.  They should be very smooth and not rough with accumulations of crud.  If they are rough, they need to be smoothed down or the new gaskets will leak.  Used some steel wool to go over the sealing surfaces and smooth them down.  Go around the sealing surfaces on both heads, and get them nice and smooth with no crud chunks remaining.

Now you need to clean the gasket remnants from the valve covers.  Do it the same way.  Get the sealing surface there smooth as well.  Don’t forget to clean the oil out of the valve cover as well.  Then get one of your new gaskets out (clean your hands a bit first, get all crud chunks off your hands before handling the gaskets) and apply a very light film of wheel bearing grease to one side.  Just dip you finger in the grease a little and smooth it on one side of the gasket.  You don’t need a lot, just enough to coat it with a light film.

Lay the gasket in the valve cover, coated side down.  Then coat the other side the same way.  Do not use any gasket sealer or adhesive, it’s not needed if you cleaned the sealing surfaces properly.  Once you have the gasket greased, put the valve cover back on the head, make sure it’s seated correctly, and then use your large screwdriver to pry the bail back up to the notch in the middle of the valve cover.  Repeat this with the other side.  Once again, make sure the valve cover is seated properly on the head or it will leak.

Put the distributor cap back on, remove your socket/ratchet from the alternator pulley and fire it up!  It should run at least as well as it ever did 🙂 .  If it runs much much worse and your valves were all way out of spec, you may have done it incorrectly, and you should go back and re-read the instructions carefully to see where you goofed.  I found when I did the Karmann Ghia, the valves were all in spec except the number 3 exhaust valve, which was a little tight.  I will have to keep an eye on that one.

Also check to make sure your valve cover gaskets are not leaking.  If they are, pull them off again and fix them up right so they don’t leak.

I think that’s all there is to it, so good luck.  I probably made it out to sound a lot harder than it is, once I got going it didn’t take very long at all to do all four cylinders.

How to change the oil

From http://type2.com/bartnik/oil.htm

No tech page would be complete without the most basic part of all car maintenance, the oil change.   Your oil should be changed every 3000 miles if you have a Type 1 engine and every 5000 miles is fine for the Type 4 engine, since it has an oil filter.

TYPE 1 ENGINE

The first step to an oil change is draining the old oil.  So, crawl under your car and see what you have.  Look at the bottom of the engine case, right in the center, and you will see a round metal plate.  This plate is held to the engine case with a number of very small nuts.  Your car may or may not have a large bolt in the middle of the plate.  If it does, you’re lucky!  If not, you can buy one with the large bolt.  Basically, the large drain plug in the middle of the plate makes it easier to drain the oil.  Get your oil pan underneath the plate and if you have the center drain plug, undo it and let the oil drain into the pan.  If you don’t have the center drain plug, undo the small nuts.  You’ll get to a point where you’ve got most of the nuts off and oil has started to drain.  At this point, you might as well let the oil drain rather than covering yourself with oil trying to remove the remaining nuts.

Once the oil is drained, the next step is to completely remove the plate.  For those with the center drain plug, just undo the small nuts that hold the plate to the case.  For those without the center drain plug, undo your remaining nuts and remove the plate.

Once you have the plate off, the oil screen will probably fall out into your oil pan.  If not, sometimes it hangs up on the plate mounting studs, so reach up there and pull the oil screen out.  This screen is your engine’s only method of filtering oil.  So, what you want to do is either clean your existing screen or be a big shot and spring the $2 for a new one.  The new one will come with the two gaskets you need.  If you simply reuse the old screen, you will need to buy the two gaskets.  Your best bet is to buy a new screen, which comes with the gaskets and the copper crush washers that go under the plate mounting nuts.  Since the copper crush washers cannot be reused, you will need to buy new ones anyway.  Reusing the crush washers can lead to stripping the threads in the nuts.

OK, so at this point all the oil has drained and  you have the plate, acorn nuts, (center drain plug), and oil screen laying in front of you.  Clean any oil sludge off of the plate and clean up the sealing surfaces on the bottom of the engine case with a paper towel.  Get it clean so the new gaskets will keep your oil in where it belongs.

OK, now you’re ready to put it back together.  Hold the oil screen up like it goes into the engine, then put one gasket over it on that side. Shove the whole works up into the engine where it goes, then put the other gasket on.  Then put the plate up there and start the acorn nuts (with new crush washers on each one) and the center drain plug (where applicable).  First tighten the acorn nuts, but not much at all.  The proper torque for these nuts is something ridiculously low, like 5 foot pounds.  If you tighten them any more, you’re likely to either strip the nut or pull the stud out of the case.  So just tighten them snug and then a hair more with a wrench, but be gentle.  After you tighten them, then tighten the center drain plug and make that one fairly tight.

Now, crawl out of there and open up the oil fill cap under the generator/alternator.  Put in the recommended quantity of oil (check the owner’s manual or Bentley) and the proper grade.  Whether you want to use synthetic oil is up to you, I won’t bother with that tired debate here.  I wouldn’t recommend synthetic for a Type 1 engine for the simple reason that since the engine has no oil filter, nor does it have a proper oil seal at the pulley end of the crankshaft, you will not be able to take advantage of synthetic’s longer oil change intervals.  Therefore, you will still have to change the oil just as often.  I would use 20W-50 weight conventional oil for most of the warmer climates and 10W-40 for the cooler areas.  I wouldn’t go below that unless I lived somewhere where it gets really cold.  And in the super-hot areas, you may want straight 40W oil.  I used 20W-50 in my van in the summer (before I switched to synthetic) and 10W-40 is good for the winter months.

If you have an oil bath air cleaner, now is the time to deal with that as well.  The oil in it has to be changed regularly and when better to do it than your oil change?  So, remove the air cleaner from the engine (usually a screw-clamp or two) and open it up.  Pour the old oil into your oil drain pan and wipe the air cleaner out.  Then put new fresh oil in up to the fill line in the air cleaner.  Note, this only applies if you have an oil bath air cleaner.  If you open your air cleaner and find a paper filter element, DO NOT under any circumstances add oil!

And that’s pretty much it for the oil change.  Note:  This assumes you have a bone-stock Type 1 engine.  You should also adjust your valves every 3000 miles, so you should do that at the same time you do your oil change.

Check the oil level on the dipstick.  It may seem high initially, but the oil needs time to settle, especially in the Type 4 engine, where about 1/2 a quart will stay in the oil filter after starting.  Start the engine and check for leaks and also check to make sure the oil pressure light goes out when it’s supposed to.

That’s it, you’re done your oil change.  Take the old oil and put it in some kind of container, gallon milk jugs are good.  Then take it to your local oil recycling place.  Most FLAPS will take waste oil for recycling.

Email from MOFOCO RE: Type 1 Engine & Transaxel

In trying to find the right motor for the Ghia, I emailed Paul at MOFOCO:    (See second email below about the transaxel)

Hello Jim,
If you are looking for a motor in the 150 HP range, I would suggest our Complete 2165 Outlaw Street Motor. This is a street performance motor that will give you the horsepower you desire, but designed to still be able to be driven in a daily driver.
Here is the listing for that motor configuration
http://www.mofoco.com/item/Outlaw_Street_Complete_2165cc_Motor/254/c70

  • New Aluminum Engine Case
  • New 78mm 4340 Chromoly Counterweighted Crankshaft
  • New 94mm Pistons & Barrells
  • New Chromoly I-Beam Rods
  • New Lifters
  • New Engle W120 Performance Cam
  • New Mofoco “050” cylinder heads D – Shaped intake port; made purely in USA!
  • New Dual Weber 44 Carburetors
  • 12LB Forged Lightened Flywheel – 8 Dowelled
  • New Solid Rocker Shafts
  • New Stock Doghouse Fan Shroud
  • New Doghouse Oil Cooler
  • New  Alternator
  • New Filter Pump with spin on oil filter
  • New 009 Distributor
  • New Fuel Pump
  • Hot tested before leaving our facility
  • All engines come with a 12 month warranty.


Please let me know what questions you might have

Thank you for your email

Paul


Hi Jim,
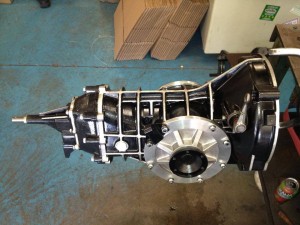
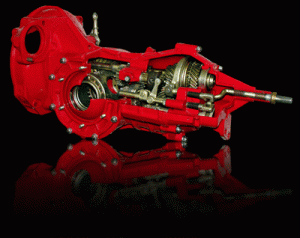
Yes, we can build you a High Performance Transaxle as well to match with the motor.
This is what I can make your transmission look like.
MoFoCo Transaxel

Please let me know what additional questions you might have.

Thank you

Paul

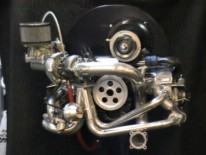
Custom Engine Bay

So again, I sit here trying to find pictures of custom engine bays and again, I’m coming up empty handed.  There just doesn’t seem to be a lot documented on these cars.  I found this.  I think it looks nice.

Engine: To Build or Rebuild

At first, I though my best option was to rebuild the factory 1600cc engine and install a turbo on it.  Turbos are great and they can definitely make good power, but the plumbing and maintenance can be a definite downside.

After reconsidering, I believe I want to remove the factory engine completely, store it and build a new engine from scratch.

The Case:

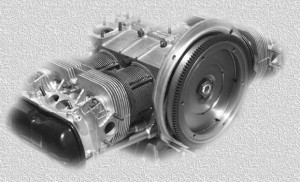
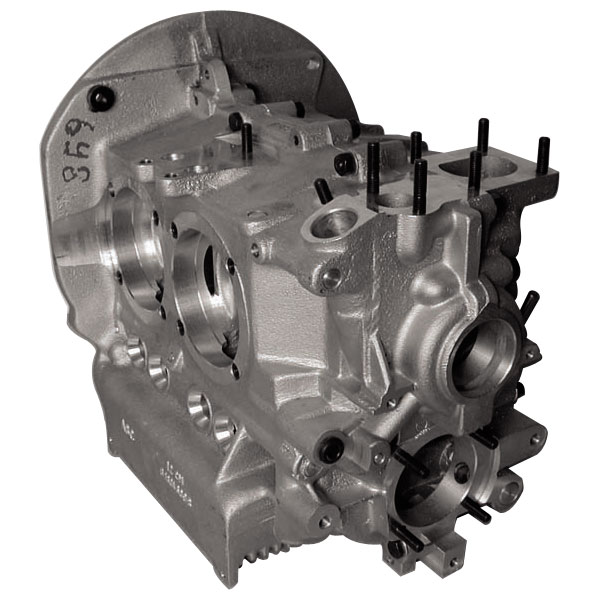
Aluminum CaseHere’s my starting point:  an aluminum racing case.  It’s about 20 pounds heavier than the factory magnisium alloy case, but will offer more strength to handle the increased power output.

This case is machined for use with 94mm pistons.  Coupled with a mild stroke of 78mm, this should give me a displacement of 2165cc.  Add a cam with good street torque (Engle 110/120), dual 44mm Webers, custom ported big-valve heads, heavy duty single springs and a counter-weighted crank and we are off to the races.

Additionally, go with a full-flow oil system, small external oil filter and cooler and run 9:1 compression, so I can use pump gas.

We are talking dependable, near 911S performance (160HP range) and I’ll only have to change oil and adjust valves from time to time.